pretotyping vs productyping

Something to keep in mind when starting the adventures of rapid prototyping (and 3D printing) – or for that matter during software development, is to consider what we need to create and do just that.
Pretotyping is about “Make sure you are building the right it before you built it right.”
A prototype is made to make sure we are building it right, but too seldom a pretotype is created to test that the right it is being built.

So the great idea with a pretotype is about failing early (with low costs) or starting making a prototype of the important bits.
The good thing with failing early is of course that we can move on to the next idea and sooner find the ideas that are worth developing.

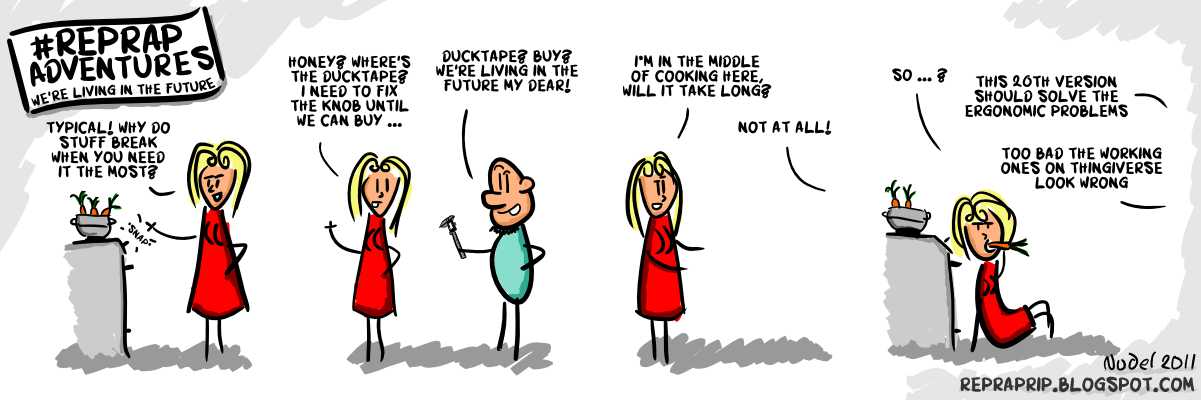
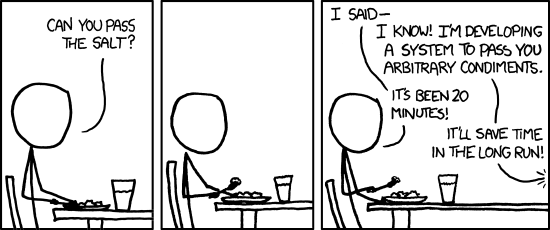
A productype on the other hand is the opposite, when features are added before the need for them is identified. The following two comics from “Rep rap adventures” and “xkcd” both show the problem with launching too late (or productyping; witch is when features not realy needed are added), and this is part of why a pretotype is nice. The sooner we can find the right it (and that is what pretotying is about) the sooner we can make a prototype and get to the market sooner.

rep rap adventures

xkcd

So why should we preotype, can’t we just make a cheep protoype?

Based on my dayjob at wi.se I have drawn the conclusion that the pretotype should be used to find the right it, not a argument for making a cheaper prototype. Even if you get someone (like us) to do a prototype for you for free – that will not help at all if it is not for the right it. Also in a pretotype it is more common (and accepted, even liked) to cheat/pretend that functions are working or simply faking them, in a prototype more often features are there, but might be limited in function.

svn switch

To change the branch you have checked out you use “svn switch url [PATH]” (the path is optional).
example:

svn switch https://example.com/svn/root/branches/thebranch .

Also svn switch can be used to “relocate” the repository url – i.e. if the server has moved/changed address/ip or similar. “svn switch –relocate FROM TO [PATH]”
example:

svn switch --relocate https://old.example.com/svn/root/oldbranch https://new.example.com/svn/root/newbranch .

warning: Only if the working copy still reflects the same repository directory, but the location of the repository itself has changed, then svn switch –relocate is safe to use.

Java PostgreSQL timestamp to a Unix timestamp

Suppose we have a timestamp in the database and would like to convert it to a Unix timestamp
There is a function called getTime() that will return the unix time.

long messageTime = rs.getTimestamp("startTime", Calendar.getInstance(TimeZone.getTimeZone("UTC"))).getTime();

Java org.w3c.dom.Document add attribute to Node(s) (Element(s))

This example will add((or update if exists) a attribute to one or several Element(s).

NodeList nodeList = document.getElementsByTagName("tagToFind");
for (int i = 0; i < nodeList.getLength(); i++){
	( (Element)nodeList.item(i) ).setAttribute("attributeNameToAdd", "attributeStringValueToAdd");
}

And what the manual (jdk6u30) says about setAttribute:

setAttribute

void setAttribute(String name,
String value)
throws DOMException

Adds a new attribute. If an attribute with that name is already present in the element, its value is changed to be that of the value parameter. This value is a simple string; it is not parsed as it is being set. So any markup (such as syntax to be recognized as an entity reference) is treated as literal text, and needs to be appropriately escaped by the implementation when it is written out. In order to assign an attribute value that contains entity references, the user must create an Attr node plus any Text and EntityReference nodes, build the appropriate subtree, and use setAttributeNode to assign it as the value of an attribute.
To set an attribute with a qualified name and namespace URI, use the setAttributeNS method.

Parameters:
name – The name of the attribute to create or alter.
value – Value to set in string form.
Throws:
DOMException – INVALID_CHARACTER_ERR: Raised if the specified name is not an XML name according to the XML version in use specified in the Document.xmlVersion attribute.
NO_MODIFICATION_ALLOWED_ERR: Raised if this node is readonly.

Java org.w3c.dom.Document getting an attribule as a string from a Node (Element)

This example shows how to get a list of attribute values from all elements with a given name.
Might not fit your needs but it should give a good idea on how to do things that are similar to this (like simply get a attribute from a singe Element).

public static List<String> getAttributesByElementName(String attribute, String element, String xmlString){
	ArrayList<Integer> listToReturn = new ArrayList<Integer>();
 
	Document document = XmlUtils.loadXMLAsDom(xmlString);
	NodeList nodeList = document.getElementsByTagName(element);
	for (int i = 0; i < nodeList.getLength(); i++){
		String currAttribute = ( (Element)nodeList.item(i) ).getAttribute(attribute);
		if ( !currAttribute.isEmpty() ){
			listToReturn.add(currAttribute );
		}
	}
	return listToReturn;
}

Java org.w3c.dom.Document output nicely formatted

This will print a nicely formatted (indented, linebreaks etc) i.e. more human readable xml document.

public static String getNiceLyFormattedXMLDocument(Document doc) throws IOException, TransformerException {
    TransformerFactory tf = TransformerFactory.newInstance();
    Transformer transformer = tf.newTransformer();
    transformer.setOutputProperty(OutputKeys.OMIT_XML_DECLARATION, "no");
    transformer.setOutputProperty(OutputKeys.METHOD, "xml");
    transformer.setOutputProperty(OutputKeys.INDENT, "yes");
    transformer.setOutputProperty(OutputKeys.ENCODING, "UTF-8");
    transformer.setOutputProperty("{http://xml.apache.org/xslt}indent-amount", "4");
 
    Writer stringWriter = new StringWriter();
    StreamResult streamResult = new StreamResult(stringWriter);
    transformer.transform(new DOMSource(doc), streamResult);
    String result = stringWriter.toString();
 
    return result;
}

Java get a XML document (file, string or inputstream) as a org.w3c.dom.Document

This helper function will read a xml string (or any InputStream) and create a Document from this.

public static Document loadXMLAsDom(String xml){
	return loadXMLAsDom(new ByteArrayInputStream(xml.getBytes()));
}
public static Document loadXMLAsDom(InputStream inputStream) {
	DocumentBuilderFactory documentBuilderFactory = DocumentBuilderFactory.newInstance();
	documentBuilderFactory.setNamespaceAware(true);
	DocumentBuilder documentBuilder = null;
	Document document = null;
	try{
		documentBuilder  = documentBuilderFactory.newDocumentBuilder();
		document = documentBuilder.parse(new InputSource(inputStream)); //use InputSource here to get better support for encodings
		inputStream.close();
	}
	catch (ParserConfigurationException e){
		System.out.println("loadXMLAsDom got a ParserConfigurationException! "); e.printStackTrace;
	}
	catch (IOException e){
		System.out.println("loadXMLAsDom got a IOException! "); e.printStackTrace;
	}
	catch (SAXException e){
		System.out.println("loadXMLAsDom got a SAXException! "); e.printStackTrace;
	}		
	return document;
}

Java getting exception.printStackTrace as a string

In cases like when I simply want to make a System.out.println or similar with some details of a exception then the following static helper function is very nice as it takes the exception (uses printStackTrace) and returns a string with the contents of it.

public static String getStackTrace(Exception e){
	StringWriter stringWriter = new StringWriter();
	PrintWriter printWrtier = new PrintWriter(stringWriter);
	e.printStackTrace(printWrtier);
	return stringWriter.toString();
}

Android custom dialog

This will create a custom dialog.

AlertDialog.Builder builder;
AlertDialog alertDialog;
 
Context mContext = this;
LayoutInflater inflater = (LayoutInflater) mContext.getSystemService(LAYOUT_INFLATER_SERVICE);
View layout = inflater.inflate(R.layout.help_dialog, (ViewGroup) findViewById(R.id.layout_root));
 
TextView text = (TextView) layout.findViewById(R.id.text);
text.setText(getString(R.string.help_string));
 
builder = new AlertDialog.Builder(mContext);
builder.setView(layout);
alertDialog = builder.create();
 
alertDialog.show();

And create a “help_dialog.xml” this name is from the inflater

<LinearLayout xmlns:android="http://schemas.android.com/apk/res/android"
    android:id="@+id/layout_root"
    android:orientation="horizontal"
    android:layout_width="fill_parent"
    android:layout_height="fill_parent"
    android:padding="10dp"
    >
    <TextView android:id="@+id/text"
        android:layout_width="fill_parent"
        android:layout_height="fill_parent"
        android:textColor="#FFF"
        />
</LinearLayout>

LayoutInflater at android dev