Ubuntu: Buffer I/O error on device sr0 logical block

Most of the time this error occurs that is a bad disk or a bad drive (or a bad cable).
Ubuntu 8.10 seams (from own experience and google) to be commonly affected by this.

You can try the following (I try them in this order)

  • If you only get buffer errors and no CRC errors, just try and wait (a few minutes) It might still be possible to install
  • Try another installation CD [from the same installation image] – if this works, then the other disk is bad
  • Try to swap out the cable to the drive (if you have a ribbon cable use one with 80 connectors, not one with 40)
  • Try to swap out the drive
  • Try another installation CD [from another installation image, old version, other dist, windows] – if this works then there is an issue with the installation image – there might be an issue worth reporting

If all this fails or you wish to install the version you have, then using a usb stick to install the image might be a good idea.

Magento: Send åäö (and other international characters) to DIBS

If your store uses DIBS to manage payments, then the risk is that you have to worry about characters like åäö.

What we had to do is to make the form post the data as ISO-8859-1.
We did this by adding accept-charset=”iso-8859-1″ to the forms that we send to DIBS.

In “/app/design/frontend/default/blank/template/dibs/standard/redirect_paymentwindow.phtml”

56
<form action="https://payment.architrade.com/paymentweb/start.action" method="post" name="dibs" id="dibs" accept-charset="iso-8859-1">

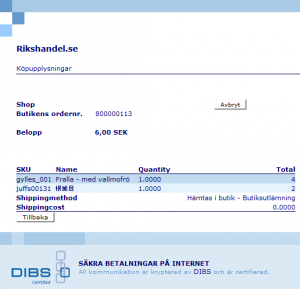
Once we had done this then the order details were shown correctly on the DIBS page (yes, the Chinese chars are just a test, I have no idea what it might say)
Details on DIBS including åäö

Linux: Converting a file encoded in ISO-8859-1 to UTF-8

If you have a file that is saves as ISO-8859-1 (or ISO-LATIN-1 if you like to call it that) and wish to convert it to UTF-8 you can use:

 iconv --from-code=ISO-8859-1 --to-code=UTF-8 ./oldfile.htm > ./newfile.html

This will create a new file with the converted encoding.

iconv can of of course convert to and from several other charsets. To see a list of all the encodings that iconv can work with use:

 iconv -l

If you wish to massconvert files find can be used with exec

 find . -name "*.txt" -exec iconv -f ISO-8859-1 -t UTF-8 {} -o {}.utf8 \;

apt-get update The following packages have been kept back

 apt-get upgrade
Reading package lists... Done
Building dependency tree
Reading state information... Done
The following packages have been kept back:
  bind9-host dnsutils libbind9-50 libdns50 libisc50 libisccc50 libisccfg50 liblwres50 linux-generic linux-generic-pae linux-image-generic
  linux-image-generic-pae
0 upgraded, 0 newly installed, 0 to remove and 12 not upgraded.

The message has been kept back most often means that the upgrade was kept back due to dependencies that are not met.

Some possible solutions

  • A simple way is to invoke dselect to help out with the update. dselect performs the actions necessary to realize that state (for instance, the removal of old and the installation of new packages).
     apt-get dselect-upgrade
  • While apt-get and aptitude are basically the same, aptitude is sometimes better at handling dependencies than apt-get
     aptitude upgrade
  • Another solution is to install the package using apt-get install to install the upgraded package and let apt-get install the missing dependencies
     apt-get install dnsutils

svn: Checksum mismatch for file expected: md5, actual: othermd5

What has (most likely) happened is that the .svn/entries file has gotten corrupt somehow; this can happen if a svn client dies halfway in a commit, or for other reasons, but that is not what this post is about.

Recently got the error message “svn: Checksum mismatch for ‘/var/www/magento/app/locale/sv_SE/template/email/sales/.svn/text-base/testfile.svn-base’; expected: ‘2b991059e896f837f33875df8070e1ab’, actual: ’71d7d03cf41d65b6c28471dd2e96c2e1′”

A quick fix this issue is to

  • Remove the .svn directory from the sales folder.
  • Move the folder sales to sales_real
  • Update the email folder (this will recreate the sales folder)
  • Move all the files from sales_real to sales
  • Commit sales
  • Delete sales_real

Obligatory disclaimer: This worked for me, it keeps the file history and all should be well.
If the sales folder would have been larger (and or my connection to the svn server slower) perhaps some other solution is preferred; but this was quick and worked.

Credit to dr. chuck for the original post

How to read the pingbars in Modern Warfare 2

By default the maximum amount of bars are 4, and each of the bars represent 100ms (latency to the host and back)
So all 4 bars means that you have 0-100 ms, 3 bars 101-200, 2 bars 201-300 and just one bar 301 (and up).

The important thing to note is that the ping is measured to the host (the person hosting the multilayer game); so if only one person has a good ping and the rest don’t, then the person with the good ping is the host.

If you wish to get a more detailed view of the ping, then it is possible to change the numbers of bars and the time each bar represents.
Edit the file (default location, if you have installed steam somewhere else, change accordingly) C:\Program files\Valve\Steam\steamapps\common\Call of duty Modern Warfare 2\players > config_mp.cfg
For now two lines are interesting, and to note is that “//” means that a comment starts, so nothing after that on a line is used by the game. I recommend that comments are used to be able to find the lines faster if you wish to tweak later on, also storing the default value is imho a good idea.

//Each bar represents this many ms ping (default is 100)
seta cg_ScoresPing_Interval "50"
//How many ping bars to show 1-10 (default is 4)
seta cg_ScoresPing_MaxBars "6"

I use 50 and 6 since I think that is sufficient and easy to count. Some others suggest for instance 20-25 ms and 10 bars, test what feels right for you.

Doing these modifications to the config shouldn’t ban you from steam, but be careful when editing the config.
Each command should be on a separate line, if it isn’t when you open the file: Close it and use another editor (for instance word pad).

This is somewhat based on a post in the iw forum

Quickly configure shorewall on Debian

By definition shorewall is not a firewall, it is a way to (more) easily configure iptables to work as a firewall.

  • First install shorewall “$ apt-get intall shorewall”
  • Enter /etc/shorewall
  • Copy the example files from /usr/share/doc/shorewall-common/default-config/ (might also be located in /usr/share/doc/shorewall/default-config/) “$ cp /usr/share/doc/shorewall-common/default-config/* .”
  • Edit the files and enter the data that your system has
    • First create zones “$ nano zones”
       #ZONE   TYPE            OPTIONS         IN OPTIONS                OUT OPTIONS
      fw      firewall
      net     ipv4
      vpn     ipv4
    • Connect zones with interfaces”$ nano interfaces”
       #ZONE   INTERFACE       BROADCAST       OPTIONS
      net     eth0            detect          tcpflags,blacklist,dhcp
      vpn	tun0		-
    • Create policies “$ nano policy”
       #SOURCE         DEST            POLICY          LOG LEVEL       LIMIT:BURST
      fw              net             ACCEPT
      vpn             net             ACCEPT
      vpn             fw              ACCEPT
      fw              vpn             ACCEPT
      net             all             DROP            info
      all             all             DROP            info
    • Create rules “$ nano rules”
       #ACTION SOURCE          DEST            PROTO   DEST    SOURCE          ORIGINAL        RATE            USER/
      #                                               PORT(S) PORT(S)         DEST            LIMIT           GROUP
      ACCEPT          net             fw             tcp     22 # ssh
      ACCEPT          net             fw             tcp     80 # web
    • Verify that the rules are fine “$ shorewall check”
    • Edit /etc/default/shorewall and set startup to 1
       # prevent startup with default configuration
      # set the following varible to 1 in order to allow Shorewall to start
       
      startup=1
    • Start the firewall “$ /etc/init.d/shorewall start”

If you later decide to update rules, zones etc run “$ /etc/init.d/shorewall restart” to load the changes.